If your hardwood floors have been worn down, you may want to consider Floor refinishing. It can be less expensive than replacing them and is less invasive to your home.
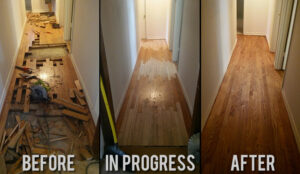
To determine whether a floor refinishing is right for your home, start with an honest assessment of the damage. It’s best to get a free consultation from an expert.
Sanding is an essential step in any hardwood floor refinishing project. It can help remove light scratches and stains, and it can even give the wood a new look. It can also help prepare a wood floor for staining or applying a protective coating of paint, lacquer or polyurethane.
There are many different types of abrasives to choose from when sanding. Some of the most common include silicon carbide, abrasive paper, abrasive cloth and ceramic. Regardless of what type of abrasive you use, it’s important to understand the differences between each.
Abrasives come in various sizes, shapes and grits. These vary in hardness, and each grit has its own characteristics, such as whether it’s coarse or fine.
The most important thing to remember when sanding is to keep the abrasive in contact with the floor. This ensures that the abrasive isn’t scratching the floor or causing damage to the finish.
If you’re using a drum sander, wear safety goggles, ear protection and a dust mask while operating the sander. Work the sander in long overlapping strokes, moving parallel to the direction of the boards, not across the wood grain.
To reduce the amount of wood dust produced, switch sandpaper frequently. It’s also important to sand in well-ventilated areas.
It’s a good idea to sand the floor in stages, starting with coarse paper and working your way up to finer grits. This way, you’re not cutting the wood too much or causing more harm than necessary.
Depending on the condition of the floor, you may need to stand more than once before it is completely smooth. Generally, hardwood floors can accept up to three deep sandings before they’re ruined.
If you’re sanding an older or very hard floor, it’s best to start with 36-grit sandpaper, rather than the coarser 24 or 16 grits used for a fresh, new floor. This can be especially true if the floor hasn’t been sanded in some time or has a heavy coating of paint or other finish on it.
Staining is a step in floor refinishing that involves applying a color-changing chemical to the wood. It can enhance the wood’s natural grain or create a new pattern. It also protects the wood from wear and tear.
There are many different types of stains, ranging from very light to dark and from water-based to oil-based. The type of stain you choose depends on the purpose of your project. For instance, a woodworker might prefer an alcohol-based stain for its ease of application and its ability to penetrate deep into the wood fibers.
Oil-based stains tend to result in more richly colored finishes than water-based stains, and they’re ideal for hard woods such as oak. However, they’re toxic and need decent ventilation. They can be applied with a brush, but use mineral spirits to clean the brush before you start applying the stain.
Whether you apply the stain with a brush or a rag, try to apply enough of it to cover the entire surface of the wood. This will minimize overlap marks that will make the finish look uneven and patchy.
If you’re staining a hardwood floor, consider choosing an alcohol- or spirit-based stain, which dry faster than traditional water-based stains. These stains are easier to apply with a brush and are ideal for wood with thick grain.
It’s a good idea to test the stain on scrap wood, so you can get the right shade. Then, follow the manufacturer’s directions for how much to apply and where to apply it.
When you’re finished, leave it to dry for 24 hours. Then, apply a protective coating called a clear finish. A coat of this will give your floors a polished, lustrous sheen and help them stand up to daily wear.