Home » Home Improvement
Category Archives: Home Improvement
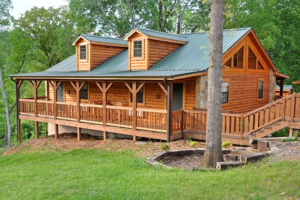
The Benefits of a Log Home
A log home is a natural, organic structure that fits right into the surrounding terrain. These homes typically feature open-concept living spaces and intricate roof trusses. For more information about log homes, you can visit on this link https://richardsonloghomes.com/ to proceed.
However, there are some things to consider before choosing a log home. First, these homes require more maintenance than conventional properties. They’re also susceptible to rot and insect infestation.
- Aesthetics
Log homes provide stunning scenic backdrops; this aesthetic appeals to people who love the outdoors. They also create a sense of intimacy and coziness. They are the perfect place to disconnect from the hectic, fast-paced world and connect with family members and the beauty of nature.
They can be crafted in various architectural styles, so you can find one that suits your design tastes. Whether you prefer the classic look of round, tapered, or sawn or the modern twist offered by timber frame construction, there’s a log home for everyone.
Traditional types of log homes use handcrafted or milled logs to build the load-bearing structure of the house. They are then sealed and chinked to protect them from the elements, creating a rustic and beautiful aesthetic.
Some people erroneously believe that log homes destroy trees. Still, today’s environmentally-conscious builders take great care to ensure they only cut down trees to build a log cabin. The logs are often harvested from sustainable forests, where the cutting is a form of reforestation that helps maintain healthy forests and reduce wildfire risk.
Both log and timber framing have a long history, but they experienced a revival in popularity in the 1970s. Today, many log and timber frame homes have open-concept designs with cathedral ceilings, walls of windows, and intricate roof trusses.
When you live in a log cabin, you can wake up to spectacular views of mountains, lakes, or rivers and enjoy the sound of birds chirping and water lapping the shore. At night, you can gaze at the stars and planets, a wonderful experience that helps you reconnect with nature and feel one with it.
- Energy Efficiency
According to the National Bureau of Standards, log homes use up to 30% less energy than stick-framed houses—their superior insulation results from a combination of factors. One of the most important is logs’ natural thermal mass and low thermal conductivity. The logs absorb the sun’s heat during the day and release it slowly through the night, keeping your home comfortable year-round. This translates into lower heating and cooling bills and reduced maintenance costs.
Another factor is the logs’ hygroscopic properties, which can quickly absorb moisture. However, this will be fine if the logs are properly treated and maintained. To prevent moisture and fungus problems, it is recommended that all logs be pretreated with an oil-based stain or preservative and then reapplied every few years. Generous roof overhangs and drainage systems are also critical for moisture control.
Log homes sometimes need help meeting strict energy codes because they don’t comply with conventional codes and need help with construction and insulation. However, many states that follow ASHRAE 90.2 include a “thermal mass” provision in their building code, making it easier to comply with the standard with a log home.
In addition to R-value, alternative heat sources such as wood stoves and passive solar design can help make your log home more energy efficient. We can help you find the right mix of these and other features that will work for your particular climate and ensure you comply with the building codes in your area.
- Fire Resistant
Log homes evoke a sense of history, quality, and tradition that many buyers desire. They also appeal to those seeking a simpler life and an emotional connection with nature. This all-natural construction method is green and provides an indoor living environment free of off-gassing associated with manufactured materials such as carpet, vinyl flooring, and paint. Using natural wood stain and regular HVAC maintenance also prevents the buildup of mold, mildew, carpenter ants, termites, and other insect infestations.
Logs’ large diameter and solid nature make them a great fire-resistant building material. This is especially true in scribe fit log construction, where the ends of each log are squared and nailed with dovetail joints, creating a strong bond that prevents the spread of fire throughout the structure. Using chinking and sealants that meet stringent one-hour fire ratings further bolsters the resistance of log walls.
While the inherent fire resistance of log homes is a huge benefit, builders and homeowners must still adhere to proper home safety protocols and create defensible space around their property. This includes maintaining a professionally inspected heating system, keeping firewood stacks away from the house, and regularly checking logs for wear or vulnerabilities that could lead to ignition.
In addition, a solid log home may only satisfy some code compliance standards in areas such as required insulation R-values. However, some states exempt log-walled homes from these energy standards, and savvy log builders have developed ways to amplify the fire resistance of their structures through careful craftsmanship and the use of special materials such as insulating foam, cladding, and a variety of fire retardant treatments.
- Versatility
Log homes offer homeowners the opportunity to make their houses their own truly. The design options are endless, and because of the way they are built, they can be adapted to fit a wide variety of floor plans.
The versatility of a log home also extends to the decor. Feel free to stray from the traditional country theme you might associate with them, as these homes can easily be fitted for any decor style. This makes them perfect for anyone who wants a rustic yet elegant living space.
Another advantage to using logs for your home is their energy efficiency. Because of the way they absorb and radiate heat, log homes are naturally insulated. This means your home will stay cooler in the summer and warmer in the winter. Log homes are also extremely sturdy and often withstand natural disasters better than standard stick-framed homes.
However, the versatility of a log home also comes with some negatives. Because logs are so exposed, they require more maintenance and attention than traditional homes. This includes re-staining and caulking regularly to ensure they are protected from the elements. Logs can also attract pests like termites and carpenter bees, which may need to be addressed by a professional. Because log homes tend to be in rural areas, they may also need help finding insurance compared to their traditional counterparts.
Choosing a company that is a Log and Timber Homes Council (LTHC) member can help you avoid some of the pitfalls associated with a log home. LTHC members must adhere to a strict code of ethics and are committed to quality service, safety, and education. They invest in research and development that helps the industry stay on top of new codes, standards, and product advancements.
- Environmentally Friendly
Log homes are a natural choice for the environmentally conscious. They are almost completely made from raw materials, except sealant and caulking. This makes them more eco-friendly than traditional homes constructed with iron, concrete, and drywall.
Timber is a renewable resource and is sourced from sustainable forests. The process of harvesting logs does not result in the loss of valuable living trees, and the logs are replanted and nurtured for future generations. Because of this, log homes are carbon-positive from cradle to gate. This includes embodied carbon from the materials used in construction and emissions generated by transportation and onsite installation.
In addition to their environmentally friendly materials, logs help promote healthy indoor air quality. They naturally regulate humidity and allow for better airflow. This can help prevent everything from pet dander to smoke and pollen from lingering in the air, which can lead to allergies, high blood pressure, and other health problems. Additionally, it can reduce the need for expensive HEPA filters, dehumidifiers, and air purifiers, which require more energy and materials to manufacture.
As the green movement continues to gain momentum, more and more people are seeking ways to minimize their environmental impact. Fortunately, log homes provide an easy solution. Their natural insulating properties can make them more energy efficient than other home types, significantly saving energy costs. In addition, wood can absorb and store solar energy during the day, which can be released into the home at night. This can eliminate the need for mechanical air conditioning, a significant greenhouse gas source. Logs are more resilient than other materials and can be recycled at the end of their life.
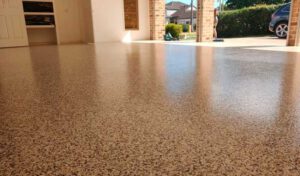
Is Outdoor Epoxy Right For You?
Many homeowners choose epoxy for flooring in garages, basements, and other areas because it is strong and durable. This type of coating is also easy to clean and resists chemicals.
However, outdoor epoxy can fade and yellow over time if exposed to sunlight. That is why it’s important to apply a clear, UV-resistant top coat to your epoxy surface. Checkout https://www.topcoattechnicians.com/ for more information.
If you’re looking for an epoxy resin that is strong enough to bond plastics and metal, look no further than Loctite Plastic Bonder. This epoxy resin creates a tough, rigid bond that is impact- and water-resistant, making it perfect for outdoor applications. It is also ideal for use on a variety of outdoor surfaces, including wood, concrete, and concrete floors.
For outdoor applications, it is important that your epoxy coating have high tensile strength. This is the strength that is measured by pulling at both the top and bottom of an epoxy cylinder. A tensile strength of 10,000 psi is typical for non-flexible epoxy materials. This is a much higher value than the compressive strength of most quality concrete, which is about 3,000 psi.
The other aspect of strength that is important in an epoxy resin is its ability to hold a weight. Compressive strength is the test used to determine if the epoxy can hold a certain amount of weight. This is tested by pushing down on both the top and bottom of an epoxy jar. A compressive strength of 10,000 psi is typical in epoxies, while quality concrete has a strength of about 3,000 psi.
Another way that you can increase the strength of your epoxy coating is by using a primer. This will help to ensure that the epoxy resin adheres properly to the surface and increases the longevity of your coating. You should also make sure that the area is clean and dry before applying a primer. This will help to prevent bubbles and other issues that can be caused by dust particles.
Once the primer is applied and has been allowed to set, you can begin the process of applying your epoxy coating. It is best to apply a thin coat of epoxy at first and then allow it to harden. After the epoxy has cured, you can apply more coats as needed to achieve your desired thickness. It is also a good idea to let each layer dry completely before applying the next one.
To maintain your outdoor epoxy flooring, you should clean up spills immediately and regularly. It is also a good idea to keep the area free from contaminants such as petroleum distillates, hydrocarbon-based solvents, lighter fluid, oils, and battery acids. Additionally, you should avoid dropping hot items on your floor, as this can cause the epoxy to burn or bubble.
Durability
Compared to concrete, epoxy is an extremely durable material that can withstand a lot of wear and tear. It is ideal for garages, patios, and other outdoor applications where the surface is often stepped on or driven over by heavy vehicles. It is also more resistant to mold and other contaminants that can erode concrete surfaces.
Aside from being able to stand up to a lot of stress, epoxy is easy to clean and maintain. A daily sweep and mop will keep the floors dust-free and clean, reducing the risk of scratches. Chemical spills should be cleaned up as soon as they occur to prevent damage to the floor. If erosive chemicals such as gasoline, diesel fuel, lighter fluid, or battery acids are not cleaned up promptly, they can damage the surface permanently.
Epoxy resins are available in a variety of colors and can be enhanced with decorative color chips, flakes, or other materials to achieve the desired look. They are also able to be buffed and polished for an even smoother finish. They are also non-skid, making them safe and comfortable to walk on.
When choosing epoxy flooring for your home, you should take into account the size of the space and the amount of traffic it gets. A professional will be able to help you determine the best color and thickness for your needs. They can also give you suggestions on how to enhance the durability of your epoxy coating.
While epoxy is an excellent choice for flooring, it is important to choose a product that has UV resistance. Otherwise, it will yellow over time. It is also a good idea to cover the area with tarps and other protective materials to prevent it from becoming damaged.
If you want to protect your outdoor epoxy surfaces, consider having them coated with an industrial-grade, UV-resistant polyurea. This will not only increase their durability, but it will also protect them from sunlight and other harsh elements. These industrial-grade coatings are very easy to clean and maintain, and they will look great for years to come.
UV Resistance
Epoxy resin is a durable material that offers excellent resistance to abrasion, corrosion, solvents, and chemicals. It can be used for many projects around the house and is perfect for coating furniture and countertops. However, it is not designed to withstand the harsh UV light from the sun. Continual exposure to UV radiation will degrade epoxy resin, turning it yellow and hazy. In addition, it will cause the resin to become brittle over time.
How quickly your epoxy turns yellow depends on the chemical formulation, the amount of time it is exposed to UV radiation, and how well it was mixed, applied, and cured. It can take just a few days of direct sunlight to begin causing yellowing and haze in some cases.
You can also add additives to your epoxy to make it more resistant to UV rays. Some of these additives include liquid dye, metallic powders, and spray paints. These are easy to mix into the epoxy and will help prolong its lifespan by slowing down its degradation.
It is important to maintain your epoxy flooring by regularly inspecting and reapplying coats as needed. This will help reduce the risk of yellowing and brittleness and will keep your surface looking beautiful for years to come.
Epoxy can be used for a wide variety of outdoor applications. It is a durable and versatile material that can be used for patios, boat decks, and walkways. With proper maintenance, your epoxy can last for years without fading or becoming brittle from exposure to the sun. To avoid this, you will need to choose a durable, UV-resistant epoxy and apply it according to the manufacturer’s instructions.
Easy Maintenance
Unlike other surfaces that can get scratched, chipped, or dull from daily wear and tear, epoxy is a tough material. This makes it a great choice for outdoor applications. Whether you have concrete patios, driveways, or garage floors, this strong coating will hold up to the elements.
Epoxy is also easy to maintain. It can be cleaned with a mop and water or even power washed. Just be sure to use only non-abrasive cleaners, as anything too harsh could cause the epoxy to dull or discolor.
Another benefit of epoxy is that it’s heat- and UV-resistant. This means that your new surface will not yellow after long exposure to sunlight. It will look great for years to come!
If you’re considering an epoxy floor for your patio or garage, it’s important to remember that this process takes time. Depending on the thickness you choose, the project can take between two and three days to complete. In addition, the concrete needs to be bone dry for the epoxy to set properly. This means that the job can only be done during certain times of the year.
This can be a challenge if you have kids or pets and need to keep them off the newly applied floor for a week or more. It can also be a huge inconvenience for businesses that depend on in-person client visits. It’s also not uncommon for dirt or debris to stick to the fresh epoxy and cause bubbling. To avoid these problems, it’s recommended to clean up spills as soon as they happen. You should also be sure to cover any sensors or controls on your garage infrared door (such as those used by cars and heavy machinery) with sandwich baggies so they don’t get wet during the curing process.
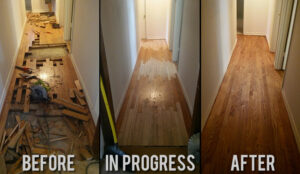
Steps in Floor Refinishing
If your hardwood floors have been worn down, you may want to consider Floor refinishing. It can be less expensive than replacing them and is less invasive to your home.
To determine whether a floor refinishing is right for your home, start with an honest assessment of the damage. It’s best to get a free consultation from an expert.
Sanding is an essential step in any hardwood floor refinishing project. It can help remove light scratches and stains, and it can even give the wood a new look. It can also help prepare a wood floor for staining or applying a protective coating of paint, lacquer or polyurethane.
There are many different types of abrasives to choose from when sanding. Some of the most common include silicon carbide, abrasive paper, abrasive cloth and ceramic. Regardless of what type of abrasive you use, it’s important to understand the differences between each.
Abrasives come in various sizes, shapes and grits. These vary in hardness, and each grit has its own characteristics, such as whether it’s coarse or fine.
The most important thing to remember when sanding is to keep the abrasive in contact with the floor. This ensures that the abrasive isn’t scratching the floor or causing damage to the finish.
If you’re using a drum sander, wear safety goggles, ear protection and a dust mask while operating the sander. Work the sander in long overlapping strokes, moving parallel to the direction of the boards, not across the wood grain.
To reduce the amount of wood dust produced, switch sandpaper frequently. It’s also important to sand in well-ventilated areas.
It’s a good idea to sand the floor in stages, starting with coarse paper and working your way up to finer grits. This way, you’re not cutting the wood too much or causing more harm than necessary.
Depending on the condition of the floor, you may need to stand more than once before it is completely smooth. Generally, hardwood floors can accept up to three deep sandings before they’re ruined.
If you’re sanding an older or very hard floor, it’s best to start with 36-grit sandpaper, rather than the coarser 24 or 16 grits used for a fresh, new floor. This can be especially true if the floor hasn’t been sanded in some time or has a heavy coating of paint or other finish on it.
Staining is a step in floor refinishing that involves applying a color-changing chemical to the wood. It can enhance the wood’s natural grain or create a new pattern. It also protects the wood from wear and tear.
There are many different types of stains, ranging from very light to dark and from water-based to oil-based. The type of stain you choose depends on the purpose of your project. For instance, a woodworker might prefer an alcohol-based stain for its ease of application and its ability to penetrate deep into the wood fibers.
Oil-based stains tend to result in more richly colored finishes than water-based stains, and they’re ideal for hard woods such as oak. However, they’re toxic and need decent ventilation. They can be applied with a brush, but use mineral spirits to clean the brush before you start applying the stain.
Whether you apply the stain with a brush or a rag, try to apply enough of it to cover the entire surface of the wood. This will minimize overlap marks that will make the finish look uneven and patchy.
If you’re staining a hardwood floor, consider choosing an alcohol- or spirit-based stain, which dry faster than traditional water-based stains. These stains are easier to apply with a brush and are ideal for wood with thick grain.
It’s a good idea to test the stain on scrap wood, so you can get the right shade. Then, follow the manufacturer’s directions for how much to apply and where to apply it.
When you’re finished, leave it to dry for 24 hours. Then, apply a protective coating called a clear finish. A coat of this will give your floors a polished, lustrous sheen and help them stand up to daily wear.
What You Need to Do Before Flooring Installation
If you’re considering installing new flooring in your home, you may be wondering what you need to do before getting started. Read on Vinyl Plank Flooring Installation to learn more.
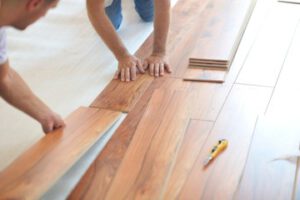
When you decide to get new flooring in your home, there are some things you need to do first. These preparations will help ensure your installation goes smoothly.
One of the most important things to do is clear out the area before installation. This will help minimize cleanup and avoid accidental scratches.
You will need to remove furniture from the room. Depending on the type of flooring you choose, you may need to clear out shelves, closets, and other areas.
Before installing a new floor, you need to declutter the area and make sure there is enough room for the installers. Also, you need to make sure your pets and children are safe. Some installers will move heavy furniture and appliances for you. They will also make sure your electronics are properly disconnected.
Before the work begins, you need to remove any glass, ceramic, or glass-topped lighting fixtures. The same goes for any wall hangings or other decorations. Ideally, you will be moving these items into another room.
Then, you will need to make arrangements for any gas and electrical appliances. Gas-powered appliances need to be removed before installation. In addition, you need to provide access for the company to run the electric outlets. If you do not have these in place, you may need to arrange for professionals to do it for you.
After the flooring is installed, you can start painting. However, before you paint, you should check with the flooring specialist about the best methods for cleaning the surface. Many people opt for hardwood flooring because it does not hold dust.
You may need to make a few minor adjustments to your doors. Be sure to use hinges, not screws, when replacing them.
Getting a quote for flooring installation is important, especially if you’re planning to renovate or remodel your home. Having new floors installed can boost your home’s value and add to its appeal. You also need to consider the type of floor you’re going to install.
There are many different types of flooring and materials to choose from. Some of them are more expensive than others, but you can save money by shopping around. For example, you can opt for a slightly less expensive material and still get what you need.
A quote for a project like this can vary depending on the size of your house, your flooring type, your location, and the type of contractor you hire. A professional installer should be able to provide a price estimate for you.
If you’re ready to start a flooring project, you can either email or call a company. Many flooring companies offer free estimates. However, you may need to pay for travel costs or furniture moving fees.
The average cost of installing flooring is $3,067 for 500 square feet. Labor costs are typically the second largest factor in determining the cost of a job.
While the cost of a single flooring installation may seem high, the total cost of the entire project will depend on the size of your home, the type of floor you’re installing, and whether you’re removing an existing floor.
To get an accurate flooring installation quote, you should also inquire about any additional services the contractor might offer. For example, you might need to remove existing floors, or you might need to replace subfloors.
Another thing to keep in mind is the quality of the material. High-end materials can drive up the cost of a flooring project, but you can choose lower-cost materials if you want to save.